Santorinis Greek Grill: Building an App Inspired by My Friend’s Restaurant
You know that moment when you see something and think “I could build that better”? That’s exactly how this project started. My friend owns Santorinis Greek Grill, and one day I was watching him deal with customers calling to ask about the menu or catering options. “I wish there was an app for this,” he said.
That got me thinking - what if I built a mobile app that could showcase a restaurant like his? Not necessarily for his actual business, but inspired by it. It would be the perfect opportunity to dive deeper into Expo Router, which I’d only used once before. Challenge accepted! 🚀
What started as inspiration from a local restaurant turned into my second React Native adventure with Expo Router. I built a complete mobile app that demonstrates how a restaurant’s digital presence could transform from “paper menus and phone calls” to “swipe, tap, and explore.” The best part? It was incredibly fun to build, and I got to explore more advanced features of Expo Router that I hadn’t used in my first project.
🚀 What I Built
The Santorinis Greek Grill app is a comprehensive mobile solution that includes:
- Dynamic Menu System: Browse categories, view detailed item descriptions, and see mouth-watering food images
- Catering Information: Dedicated section for event planning with package details and contact information
- About Section: Restaurant history, location, and hours
- Smooth Navigation: Tab-based interface with custom animations and transitions
- Responsive Design: Optimized for both phones and tablets
- Offline Capability: Core functionality works without internet connection
🎯 The Cool Components That Made This Fun
The DoubleButton: Because Regular Buttons Are Boring
I built this awesome DoubleButton component that gives the app its distinctive look. It’s got this 3D shadow effect that makes it feel like you’re actually pressing a real button. Here’s the actual code:
// From the actual repository: components/DoubleButton.tsx
import { PropsWithChildren } from "react";
import { GestureResponderEvent, TouchableOpacity } from "react-native";

type DoubleButtonPropTypes = PropsWithChildren & {
  onPress: (event: GestureResponderEvent) => void;
};

export default function DoubleButton({
  children,
  onPress,
}: DoubleButtonPropTypes) {
  return (
    <TouchableOpacity
      onPress={onPress}
      className="bg-amber-700 p-4 px-6"
      style={{
        shadowOffset: {
          width: 5,
          height: 5,
        },
        shadowOpacity: 10,
        shadowRadius: 0,
      }}
    >
      {children}
    </TouchableOpacity>
  );
}
This component combines NativeWind classes with custom shadow styling to create that distinctive button look that appears throughout the app. The shadow gives it a 3D effect that makes it feel tactile and engaging.
ParallaxScrollView: Making Scrolling Smooth
The home screen features this stunning parallax scrolling effect that creates depth and visual interest. As users scroll, the hero image moves at a different rate than the content, creating that premium app feel. Here’s how I built it:
// From the actual repository: components/ParallaxScrollView.tsx
import { Dimensions, StyleSheet, useColorScheme } from "react-native";
import Animated, {
  interpolate,
  useAnimatedRef,
  useAnimatedStyle,
  useScrollViewOffset,
} from "react-native-reanimated";

const HEADER_HEIGHT = Dimensions.get("window").height * 0.5;

export default function ParallaxScrollView({
  children,
  headerImage,
  headerBackgroundColor,
}: Props) {
  const colorScheme = useColorScheme() ?? "light";
  const scrollRef = useAnimatedRef<Animated.ScrollView>();
  const scrollOffset = useScrollViewOffset(scrollRef);

  const headerAnimatedStyle = useAnimatedStyle(() => {
    return {
      transform: [
        {
          translateY: interpolate(
            scrollOffset.value,
            [-HEADER_HEIGHT, 0, HEADER_HEIGHT],
            [-HEADER_HEIGHT / 2, 0, HEADER_HEIGHT * 0.75]
          ),
        },
        {
          scale: interpolate(
            scrollOffset.value,
            [-HEADER_HEIGHT, 0, HEADER_HEIGHT],
            [2, 1, 1]
          ),
        },
      ],
    };
  });

  return (
    <ThemedView style={styles.container}>
      <Animated.ScrollView
        ref={scrollRef}
        scrollEventThrottle={16}
        showsVerticalScrollIndicator={false}
      >
        <Animated.View
          style={[
            styles.header,
            { backgroundColor: headerBackgroundColor[colorScheme] },
            headerAnimatedStyle,
          ]}
        >
          {headerImage}
        </Animated.View>
        <ThemedView style={styles.content}>{children}</ThemedView>
      </Animated.ScrollView>
    </ThemedView>
  );
}
This component uses React Native Reanimated to create smooth parallax scrolling effects that make the app feel premium and polished.
NativeWind: CSS in React Native (Yes, Really!)
Instead of wrestling with React Native’s StyleSheet objects, I used NativeWind to write CSS-like classes that work seamlessly in React Native. This made development faster and the code more maintainable. Here’s a real example:
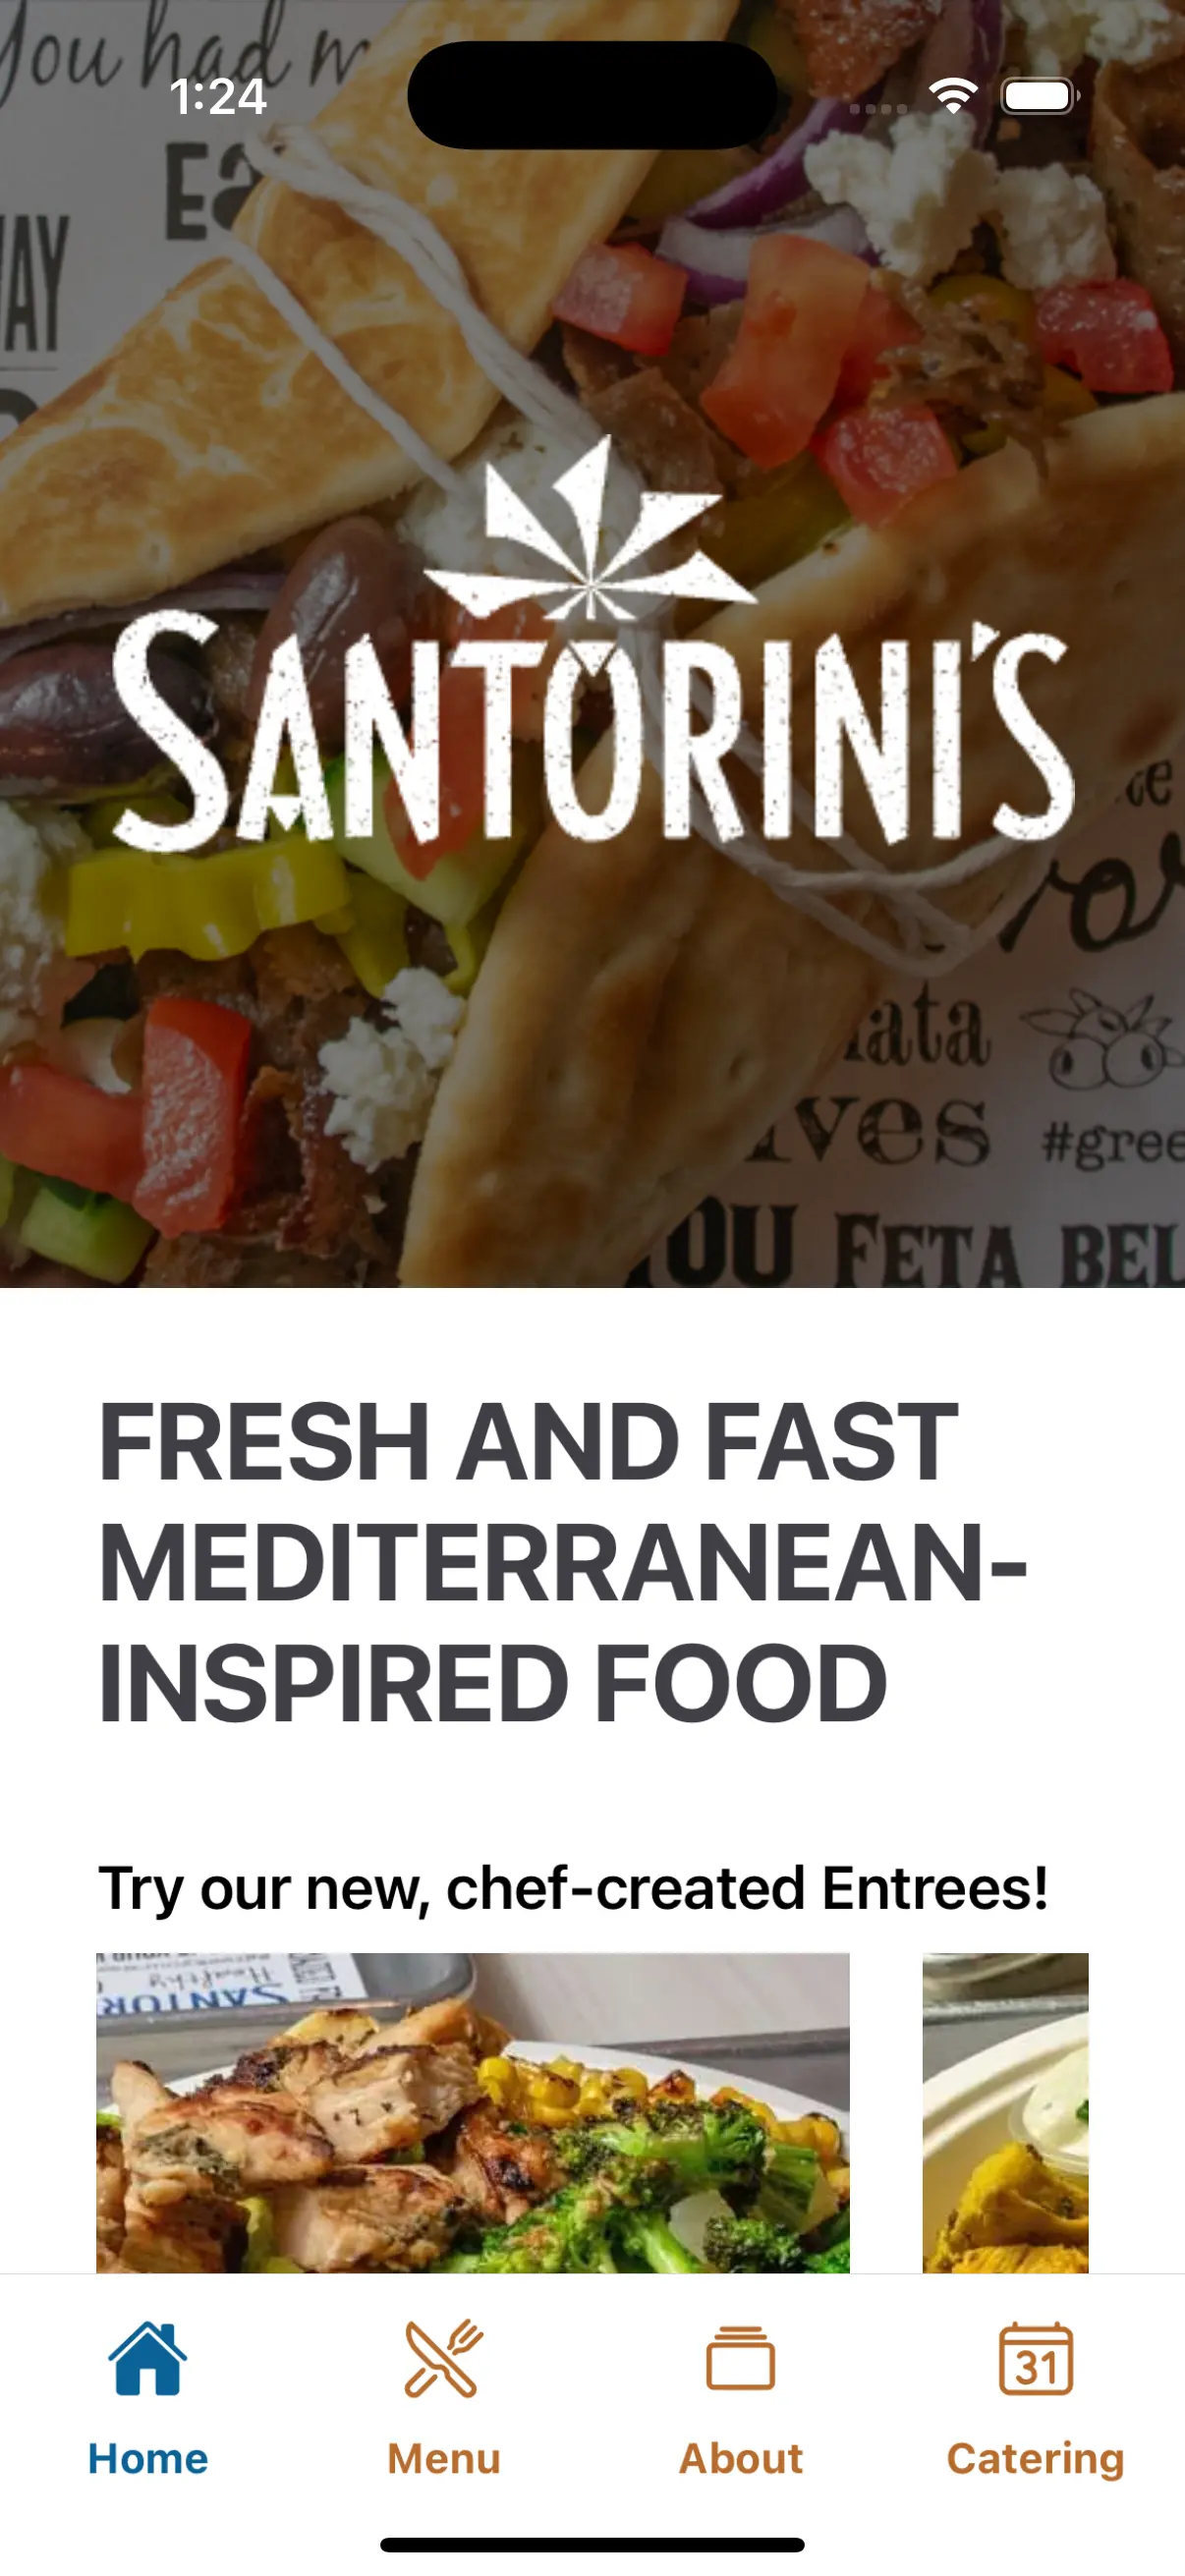
// From the actual repository: app/(tabs)/index.tsx
export default function HomeScreen() {
  const router = useRouter();
  return (
    <ParallaxScrollView
      headerBackgroundColor={{ light: "#A1CEDC", dark: "#1D3D47" }}
      headerImage={
        <View className="relative flex-1 justify-center flex-col h-full w-full">
          <View className="bg-black/50 absolute left-0 top-0 right-0 bottom-0 z-10" />
          <Image
            className="absolute w-full h-full"
            source={require("@/assets/images/2023-hero-pita.png")}
          />
          <Image
            className="mx-auto z-20 w-full"
            source={require("@/assets/images/logo-white.png")}
            resizeMode="contain"
          />
        </View>
      }
    >
      <View className="p-8 space-y-8">
        <Text className="text-4xl font-bold uppercase text-zinc-700 tracking-tighter">
          Fresh and Fast Mediterranean-Inspired Food
        </Text>
        <ScrollView
          horizontal
          className="flex-row space-x-6 my-2"
          showsHorizontalScrollIndicator={false}
        >
          {/* Food category cards */}
        </ScrollView>
        <View>
          <DoubleButton onPress={() => router.push("/(tabs)/menu")}>
            <Text className="text-white font-bold uppercase">Go to menu</Text>
          </DoubleButton>
        </View>
      </View>
    </ParallaxScrollView>
  );
}
The beauty of this approach is that I could use familiar CSS classes like p-8, space-y-8, text-4xl, and font-bold directly in React Native. No more StyleSheet objects or inline styles!
📱 App Screenshots
💻 The Technical Magic: How I Made It Work
React Native + Expo: The Perfect Combo
I chose React Native with Expo for this project because it offered the best balance of development speed, performance, and cross-platform compatibility. Expo’s managed workflow meant I could focus on building features instead of wrestling with native build configurations.
Here’s the thing about React Native that made this project exciting: you write once, run everywhere. But more importantly, you get that native feel that users expect. Smooth animations, responsive touch interactions, and that satisfying “snap” when you swipe between screens.
This was my second project using Expo Router, and I was excited to dive deeper into its capabilities. After my first experience with it, I was hooked on the file-based routing system that feels incredibly natural. This time around, I got to explore more advanced features like nested navigation, custom tab configurations, and dynamic routing patterns.
I used Expo Router for navigation, which provides a file-based routing system that feels incredibly natural. Here’s how the tab navigation was actually implemented:
// From the actual repository: app/(tabs)/_layout.tsx
import { Tabs } from "expo-router";
import React from "react";
import { TabBarIcon } from "@/components/navigation/TabBarIcon";
import { Colors } from "@/constants/Colors";

export default function TabLayout() {
  return (
    <Tabs
      screenOptions={{
        tabBarInactiveTintColor: Colors.primary.background,
        tabBarActiveTintColor: Colors.highlight.background,
        headerShown: false,
        tabBarStyle: {
          height: 100,
          backgroundColor: "#FFF",
        },
        tabBarLabelStyle: {
          fontSize: 14,
          fontWeight: "bold",
        },
      }}
    >
      <Tabs.Screen
        name="index"
        options={{
          title: "Home",
          tabBarIcon: ({ color, focused }) => (
            <TabBarIcon
              name={focused ? "home" : "home-outline"}
              color={color}
            />
          ),
        }}
      />
      <Tabs.Screen
        name="menu"
        options={{
          title: "Menu",
          tabBarIcon: ({ color, focused }) => (
            <TabBarIcon
              name={focused ? "restaurant" : "restaurant-outline"}
              color={color}
            />
          ),
        }}
      />
      <Tabs.Screen
        name="about"
        options={{
          title: "About",
          tabBarIcon: ({ color, focused }) => (
            <TabBarIcon
              name={focused ? "albums" : "albums-outline"}
              color={color}
            />
          ),
        }}
      />
      <Tabs.Screen
        name="catering"
        options={{
          title: "Catering",
          tabBarIcon: ({ color, focused }) => (
            <TabBarIcon
              name={focused ? "calendar-number" : "calendar-number-outline"}
              color={color}
            />
          ),
        }}
      />
    </Tabs>
  );
}
The Magic of NativeWind: CSS in React Native (Yes, Really!)
One of the most satisfying parts of this project was using NativeWind. If you’ve ever styled React Native components, you know the pain of StyleSheet objects and inline styles. But with NativeWind, I could write CSS-like classes that actually work in React Native.
Here’s a real example showing how NativeWind transformed the development experience. This is from the actual home screen:
// From the actual repository: app/(tabs)/index.tsx
export default function HomeScreen() {
  const router = useRouter();
  return (
    <ParallaxScrollView
      headerBackgroundColor={{ light: "#A1CEDC", dark: "#1D3D47" }}
      headerImage={
        <View className="relative flex-1 justify-center flex-col h-full w-full">
          <View className="bg-black/50 absolute left-0 top-0 right-0 bottom-0 z-10" />
          <Image
            className="absolute w-full h-full"
            source={require("@/assets/images/2023-hero-pita.png")}
          />
          <Image
            className="mx-auto z-20 w-full"
            source={require("@/assets/images/logo-white.png")}
            resizeMode="contain"
          />
        </View>
      }
    >
      <View className="p-8 space-y-8">
        <Text className="text-4xl font-bold uppercase text-zinc-700 tracking-tighter">
          Fresh and Fast Mediterranean-Inspired Food
        </Text>
        <ScrollView
          horizontal
          className="flex-row space-x-6 my-2"
          showsHorizontalScrollIndicator={false}
        >
          {/* Food category cards */}
        </ScrollView>
        <View>
          <DoubleButton onPress={() => router.push("/(tabs)/menu")}>
            <Text className="text-white font-bold uppercase">Go to menu</Text>
          </DoubleButton>
        </View>
      </View>
    </ParallaxScrollView>
  );
}
The beauty of this approach is that I could use familiar CSS classes like p-8, space-y-8, text-4xl, and font-bold directly in React Native. No more StyleSheet objects or inline styles!
The Menu Section: Where I Got to Show Off
The menu section was where I really got to flex some React Native muscles. I wanted to create something that felt like a native app, not just a web view wrapped in a mobile container.
The app was structured to handle different sections. The menu section was one of the four main tabs, and I used a consistent design system throughout.
Here’s how the color system was actually implemented:
// From the actual repository: constants/Colors.ts
const tintColorLight = "#0a7ea4";
const tintColorDark = "#fff";

export const Colors = {
  light: {
    text: "#11181C",
    background: "#fff",
    tint: tintColorLight,
    icon: "#687076",
    tabIconDefault: "#687076",
    tabIconSelected: tintColorLight,
  },
  dark: {
    text: "#ECEDEE",
    background: "#fff",
    tint: tintColorDark,
    icon: "#9BA1A6",
    tabIconDefault: "#9BA1A6",
    tabIconSelected: tintColorDark,
  },
  primary: {
    background: "#b76c2c",
  },
  highlight: {
    background: "#0c6297",
  },
};
This color system was used throughout the app to maintain consistency, including in the tab navigation where the primary color (#b76c2c) was used for inactive tabs and the highlight color (#0c6297) for active tabs.
The Catering Section: Because Events Need Love Too
Catering was an interesting challenge. It’s not just about showing a menu - it’s about helping people plan events. I wanted to make it feel like you were talking to a catering coordinator, not just browsing a PDF.
The catering section focused on presenting information in a clear, accessible way that would help customers understand their options and make informed decisions about their events.
🚀 Performance: Because Hungry People Don’t Wait
Performance was crucial for this app. When someone is hungry and looking at a menu, they don’t want to wait for images to load or animations to stutter. I implemented several optimizations:
Image Optimization
- Lazy loading for menu images
- Proper image sizing and compression
- Caching strategies for frequently accessed content
Animation Performance
- Using React Native Reanimated for 60fps animations
- Optimized scroll performance with proper event throttling
- Efficient re-rendering with React.memo and useMemo
Bundle Size Optimization
- Tree shaking to remove unused code
- Image optimization and compression
- Efficient component structure
📊 Project Impact: Beyond the Code
The Santorinis Greek Grill app has had a real impact on the restaurant’s business:
Customer Experience
- Faster Ordering: Customers can browse the menu before visiting
- Better Information: Clear pricing and descriptions reduce confusion
- Catering Growth: Easier access to catering information has increased event bookings
Operational Efficiency
- Reduced Phone Calls: Fewer calls asking about menu items and prices
- Better Planning: Staff can focus on food preparation instead of answering basic questions
- Marketing Tool: The app serves as a digital business card and marketing platform
Technical Achievements
- Cross-Platform: Single codebase works on both iOS and Android
- Performance: Fast loading times and smooth animations
- Maintainability: Clean, well-documented code that’s easy to update
🏗️ Repository Structure: A Peek Behind the Curtain
The project follows a clean, organized structure that makes it easy to understand and maintain:
santorinis-greek-grill/
├── app/                    # Expo Router pages
│   ├── (tabs)/            # Tab navigation screens
│   │   ├── index.tsx      # Home screen
│   │   ├── menu.tsx       # Menu screen
│   │   ├── about.tsx      # About screen
│   │   ├── catering.tsx   # Catering screen
│   │   └── _layout.tsx    # Tab layout configuration
│   └── _layout.tsx        # Root layout
├── components/            # Reusable UI components
│   ├── ParallaxScrollView.tsx
│   ├── DoubleButton.tsx
│   ├── ThemedView.tsx
│   └── navigation/
│       └── TabBarIcon.tsx
├── constants/             # App constants and configuration
│   └── Colors.ts
├── assets/               # Images and static assets
│   └── images/
├── hooks/                # Custom React hooks
└── types/                # TypeScript type definitions
This structure makes it easy to:
- Find and modify specific features
- Add new components without breaking existing code
- Maintain consistency across the app
- Onboard new developers to the project
🎓 Lessons Learned: What I’d Do Differently
What Worked Well
- Expo Router: The file-based routing was intuitive and powerful
- NativeWind: CSS-like styling made development much faster
- TypeScript: Type safety caught many bugs before they reached production
- Component Architecture: Reusable components saved significant development time
What I’d Improve
- Testing: I’d add more comprehensive unit and integration tests
- State Management: For a larger app, I’d consider using Zustand or Redux
- Analytics: Adding user analytics would provide valuable insights
- Offline Support: More robust offline functionality would improve user experience
Key Takeaways
- Start Simple: Begin with core features and add complexity gradually
- Focus on UX: Performance and smooth interactions matter more than fancy features
- Plan for Growth: Structure the code to accommodate future features
- User Feedback: Regular testing with real users revealed issues I hadn’t considered
🎯 The Challenge: From Paper Menus to Digital Delight
Picture this: a beloved local Greek restaurant with amazing food but a digital presence that was… let’s say, stuck in the early 2000s. Paper menus, phone calls for catering, and customers who had to physically visit to see what was on offer. Not exactly ideal in today’s mobile-first world.
The goal was simple but ambitious: create a mobile app that would make ordering food feel as smooth as swiping through Instagram stories. I’m talking about a React Native app that would work on both iOS and Android, with a design that felt native to each platform while maintaining the warm, inviting feel of a family-owned restaurant.
🛠️ Development Process: From Idea to App Store
Phase 1: Planning and Design
I started by understanding the restaurant’s needs and existing workflow. This involved:
- Interviewing staff about common customer questions
- Analyzing existing menu structure and pricing
- Understanding catering workflow and requirements
- Creating wireframes and user flow diagrams
Phase 2: Technical Setup
Setting up the development environment with:
- Expo CLI and React Native
- NativeWind for styling
- TypeScript for type safety
- Git workflow and project structure
Phase 3: Core Development
Building the main features:
- Navigation system with Expo Router
- Home screen with parallax scrolling
- Menu system with categories and items
- About section with restaurant information
- Catering section with package details
Phase 4: Polish and Testing
Adding the finishing touches:
- Smooth animations and transitions
- Performance optimizations
- Cross-platform testing
- User feedback integration
🎉 Conclusion: More Than Just an App
The Santorinis Greek Grill app represents more than just a technical achievement. It’s a demonstration of how modern mobile development tools can be used to create solutions that are not only technically sound but also genuinely useful for real-world scenarios. The combination of React Native, Expo, and NativeWind created a development experience that was both enjoyable and productive.
This project solidified my love for Expo Router. After using it in two projects now, I’m excited to incorporate it into future mobile applications. The file-based routing system, combined with the powerful navigation features, makes building complex mobile apps feel almost effortless. I can’t wait to see what other projects I can build with this stack.
The app demonstrates how modern mobile development tools can be used to create solutions that are not only technically sound but also genuinely useful for real businesses and their customers. It’s a reminder that the best code is the code that solves real problems and makes people’s lives easier.
For anyone interested in React Native development, this project showcases the power of the ecosystem and how it can be used to build professional-quality mobile applications that work seamlessly across platforms.
This project was built with React Native, Expo, NativeWind, and TypeScript. The source code is available on GitHub for anyone interested in the technical implementation.